在看 Mars 的教学视频《Android开发视频教学》中,他提到 Service 是 Android 系统中一个勤勤恳恳的劳模,在应用程序中从不露面但一直默默为其服务。

首先说说什么是 Service。Android 系统中的 Service 是一个非常重要的应用程序组件,没有图形化界面,通常用来处理一些耗时长的操作,比如上传下载等,也可以用来处理一些在浏览界面之外的事,如后台音乐播放等。
官方文档中给出的解释是:
A Service is an application component representing either an application's desire to perform a longer-running operation while not interacting with the user or to supply functionality for other applications to use.
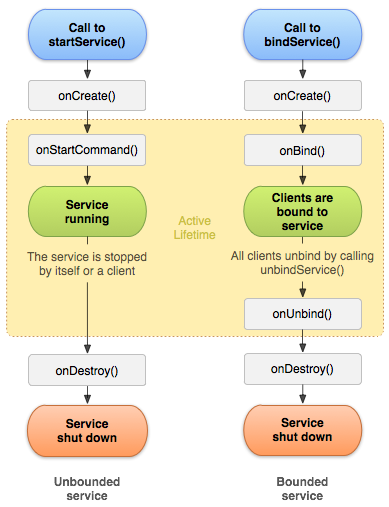
启动 Service 的方式有两种,Started 和 Bound。

Started 方式启动 Service 时,调用者和服务之间没有联系,即使调用者退出了,服务仍然进行。简单实现一个 ExampleService,集成 Android 系统的 Service 类即可,但需要重写下列方法。
- package com.sinaapp.langtuteng.android.test;
- import android.app.Service;
- import android.content.Intent;
- import android.os.IBinder;
- import android.util.Log;
- public class ExampleService extends Service {
- public static final String TAG = "ExampleService";
- @Override
- public IBinder onBind(Intent arg0) {
- return null;
- }
- @Override
- public void onCreate() {
- Log.i(TAG, "ExampleService--->onCreate");
- super.onCreate();
- }
- @Override
- public void onDestroy() {
- Log.i(TAG, "ExampleService--->onDestroy");
- super.onDestroy();
- }
- @Override
- public int onStartCommand(Intent intent, int flags, int startId) {
- Log.i(TAG, "ExampleService--->onStartCommand");
- return START_NOT_STICKY;
- }
- }
当第一次运行程序,并通过 startService() 启动服务时,ExampleService 类会依次调用 onCreate() --> onStartCommand(),点击返回退出程序,不会调用 onDestroy()。注意,这里在 onCreate() 之后不会调用 onStart() 方法,是因为该方法在 API 5 之后已废弃了。
当再次运行程序时,只执行 onStartCommand() 方法。因为退出程序,后台的服务并不停止,一直存在并运行着,就不需要再次 create,除非在退出程序时调用过 stopService(),ExampleService 类则会调用 onDestroy()。所以说要想停止服务,必须 stopService 才行。
Bound 方式启动 Service 时,调用者和服务绑在一起,调用者一旦退出服务也就终止了。实现一个 BinderService 继承 Service 即可,但需要重写下列方法。
- package com.sinaapp.langtuteng.android.test;
- import android.app.Service;
- import android.content.Intent;
- import android.os.Binder;
- import android.os.IBinder;
- import android.util.Log;
- public class BinderService extends Service {
- private static final String TAG = "BinderService";
- private MyBinder binder = new MyBinder();
- public class MyBinder extends Binder {
- public BinderService getService() {
- return BinderService.this;
- }
- }
- @Override
- public IBinder onBind(Intent intent) {
- Log.i(TAG, "BinderService--->onBind");
- return binder;
- }
- @Override
- public void onCreate() {
- Log.i(TAG, "BinderService--->onCreate");
- super.onCreate();
- }
- @Override
- public void onDestroy() {
- Log.i(TAG, "BinderService--->onDestroy");
- super.onDestroy();
- }
- @Override
- public boolean onUnbind(Intent intent) {
- Log.i(TAG, "BinderService--->onUnbind");
- return super.onUnbind(intent);
- }
- public void MyMethod() {
- Log.i(TAG, "BinderService--->MyMethod");
- }
- }
当第一次运行程序,并通过 bindService() 启动服务时,BinderService 类会依次调用 onCreate() -->onBind(),点击返回退出程序,则会调用 onUnbind() -->onDestory()。
当再次运行程序时,还是和第一次一样,需要重新 create 这个服务。也可以不按返回键退出程序,手动调用 unbindService() 来停止服务。
但是,以上两种方式中,当处理一些耗时特别长的工作时,需要在实现的 Service 类新启线程处理耗时操作,但是代码量大,费事儿。可以有一种简便的方法,那就是继承 IntentService 类,实现 onHandleIntent() 方法即可,特别简便。
在 IntentService 类中,主要有以下处理:
-
创建一个与应用程序主线程分开 worker thread 用来处理所有通过传递过来的Intent请求。 -
创建一个 work queue,一次只传递一个 intent 到 onHandleIntent() 方法中,从而不用担心多线程带来的问题。 -
当处理完所有请求后自动停止服务,而不需要我们自己调用 stopSelf() 方法。 -
默认实现了 onBind() 方法,返回值为 null。 -
默认实现了 onStartCommand() 方法,这个方法将会把我们的 intent 放到 work queue 中,然后在 onHandleIntent() 中执行。
所有关于 Service 的测试方法都已打包,供免费下载,具体细节可以下载代码运行后测试即可。


