
前一段时间抽空写了《船舶报文系统项目之新建篇》和《船舶报文系统项目之开发篇》,分别说了说报文系统的开发流程以及开发中碰到的一些问题。这一篇,主要写一写项目后期的发布过程。
前面也提到过,岸端是 WEB 程序,而船端部分是桌面应用程序。至于 Web 的发布过程,这里不再详细写,很简单,做过 Web 项目的都知道发布,无外乎就是在 Tomcat 中发布项目,用它的 Manager 功能,很简单就可以把项目发布到 Tomcat 服务器上,然后直接访问即可,这里主要说说船端部分的发布过程。
-
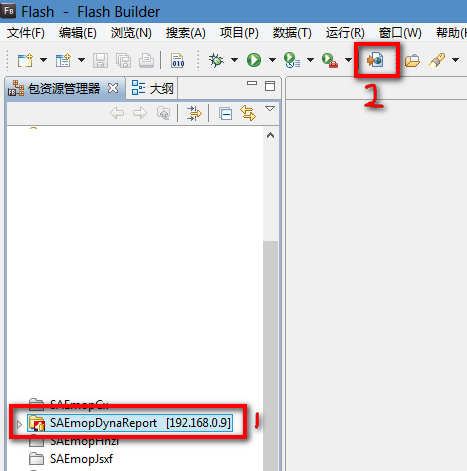
- 第一步,鼠标左键点击项目,点击导出发行版按钮。
-
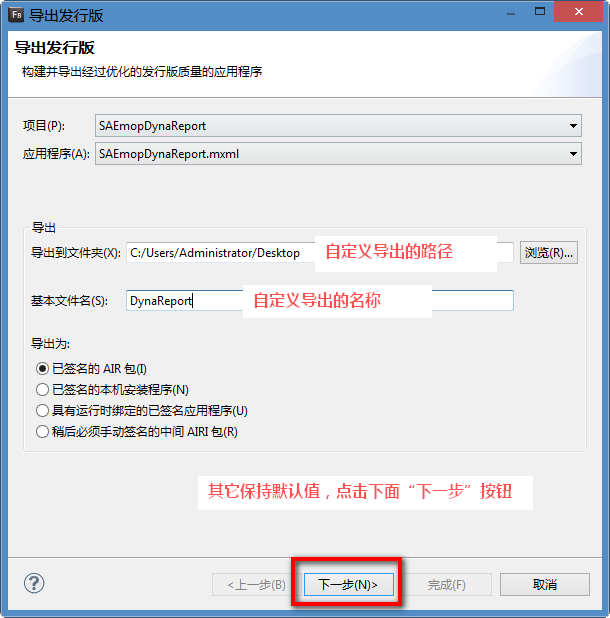
- 第二步,自定义项目导出路径和导出名称,并点击下一步按钮。
-
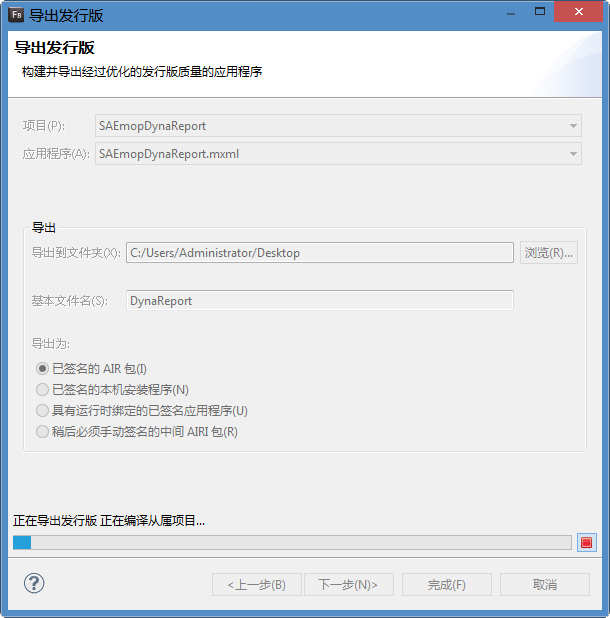
- 稍等一段时间,正在编译和导出。
-
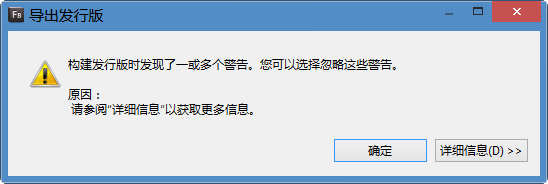
- 弹出警告信息,这些警告是项目开发中,代码中的警告,可以忽略。当然也可以修改掉代码中的所有警告,该警告框将不再显示。
-
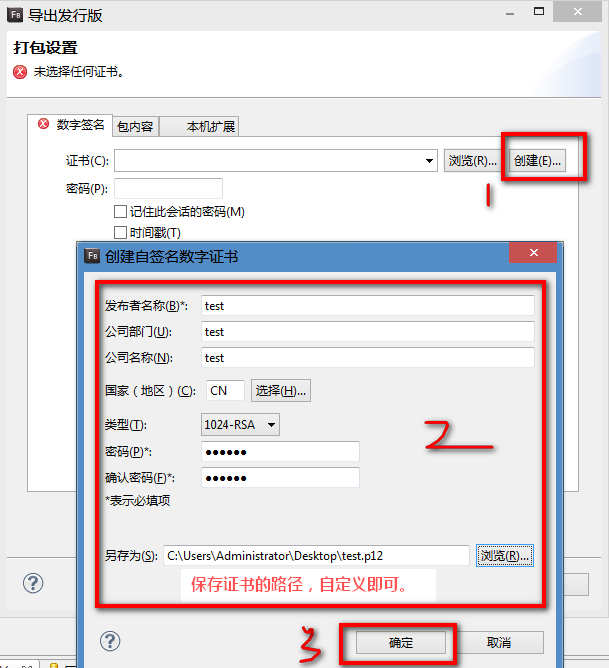
- 第三步,创建数字证书,由于是第一次发布项目,需要创建数字证书。以后发布时,选择以前创建的证书即可。
-
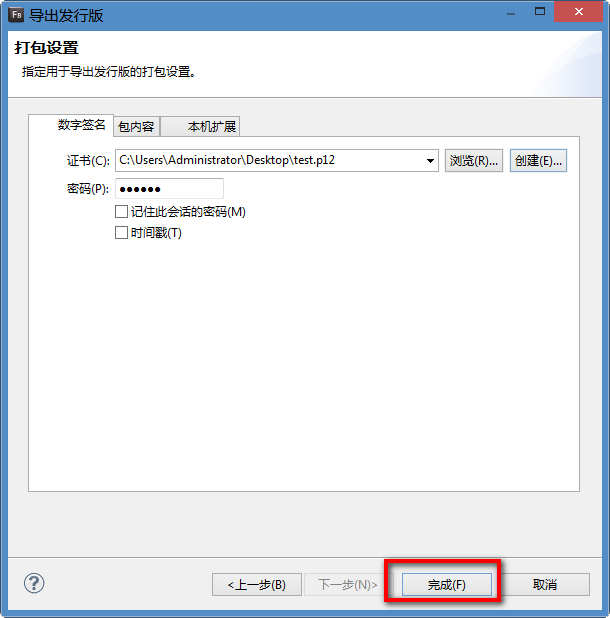
- 第四步,如果创建证书时写了密码,在该画面输入密码,并点击完成,开始打包项目。
-
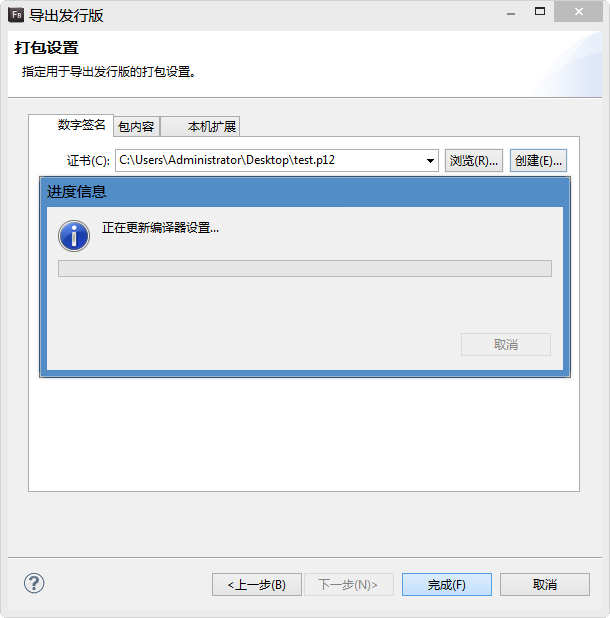
- 项目正在打包中,稍等片刻。。。
-
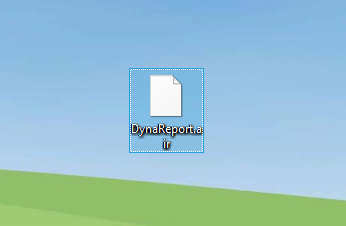
- 第五步,查看导出的项目安装包。
在导出项目前,可以修改一些配置参数,比如修改安装后的程序图标,修改安装路径及安装名称,添加版本信息,描述信息等等,都在 XXX-app.xml 中,可以进行相应的配置,下面是报文系统大概用到的配置信息:
- <!– 安装后文件夹名 –>
- <filename>DynaReport</filename>
- <!– 安装时程序名 –>
- <name>报文系统</name>
- <!– 版本号 –>
- <versionNumber>2.0.0</versionNumber>
- <!– 安装时程序描述 –>
- <description>船端报文安装程序</description>
- <!– 程序版权信息 –>
- <copyright>大连海大安信科技有限公司</copyright>
- <!– 程序安装后快捷图标 –>
- <icon>
- <image16x16>assets/16.png</image16x16>
- <image32x32>assets/32.png</image32x32>
- <image36x36>assets/36.png</image36x36>
- <image48x48>assets/48.png</image48x48>
- <image57x57>assets/57.png</image57x57>
- <image72x72>assets/72.png</image72x72>
- <image114x114>assets/114.png</image114x114>
- <image128x128>assets/128.png</image128x128>
- </icon>
- <!– 等等等等,都可以自定义导出的程序 –>
这里有网友大概整理了一份比较全面的注释文档,分享给大家,原文看这里。
- <?xml version=“1.0” encoding=“UTF-8”?>
- <application xmlns=“http://ns.adobe.com/air/application/2.6”>
- <!– The application identifier string, unique to this application. Required. –>
- <id>AIRTest1</id><!– 软件ID,当安装时系统将会检测同一ID软件版本,版本高的即做更新操作 –>
- <!– Used as the filename for the application. Required. –>
- <filename>AIRTest_filename</filename><!– 安装界面中 Application: –>
- <!– The name that is displayed in the AIR application installer. Optional. –>
- <name>AIRTest_name</name><!– 桌面快捷方程式及窗口和系统控制面板添加程序中名称 –>
- <!– An application version designator (such as “v1”, “2.5”, or “Alpha 1”). Required. –>
- <versionNumber>0.0.0</versionNumber><!– 软件版本 –>
- <!– Description, displayed in the AIR application installer. Optional. –>
- <description>AIRTest_description</description><!– 安装第二个界面中的 description –>
- <!– Copyright information. Optional –>
- <copyright>AIRTest_copyright</copyright>
- <!– Settings for the application’s initial window. Required. –>
- <initialWindow>
- <!– The main SWF or HTML file of the application. Required. –>
- <!– Note: In Flex Builder, the SWF reference is set automatically. –>
- <content>[This value will be overwritten by Flex Builder in the output app.xml]</content>
- <!– The title of the main window. Optional. –>
- <title>AIRTest_title</title><!– 窗体标题,当此处为注释状态时取 name标签中内容 –>
- <!– The type of system chrome to use (either “standard” or “none”). Optional. Default standard. –>
- <systemChrome>none</systemChrome><!– standard为标准窗体,none 为圆滑窗体 –>
- <!– Whether the window is transparent. Only applicable when systemChrome is false. Optional. Default false. –>
- <transparent>true</transparent><!– 背景是否透明 –>
- <!– Whether the window is initially visible. Optional. Default false. –>
- <visible>true</visible><!– 窗体初始化的时候是否可见 –>
- <!– Whether the user can minimize the window. Optional. Default true. –>
- <minimizable>true</minimizable><!– 是否允许最小化 –>
- <!– Whether the user can maximize the window. Optional. Default true. –>
- <!– <maximizable></maximizable> –><!– 是否允许最大化 –>
- <!– Whether the user can resize the window. Optional. Default true. –>
- <!– <resizable></resizable> –><!– 是否允许缩放窗体 –>
- <!– The window’s initial width. Optional. –>
- <!– <width></width> –><!– 窗体宽 –>
- <!– The window’s initial height. Optional. –>
- <!– <height></height> –><!– 窗体高 –>
- <!– The window’s initial x position. Optional. –>
- <!– <x></x> –><!– 窗体X位置坐标 –>
- <!– The window’s initial y position. Optional. –>
- <!– <y></y> –><!– 窗体Y位置坐标 –>
- <!– The window’s minimum size, specified as a width/height pair, such as “400 200”. Optional. –>
- <!– <minSize></minSize> –><!– 窗体最小化值 –>
- <!– The window’s initial maximum size, specified as a width/height pair, such as “1600 1200”. Optional. –>
- <!– <maxSize></maxSize> –><!– 窗体最大化值 –>
- </initialWindow>
- <!– The subpath of the standard default installation location to use. Optional. –>
- <installFolder>AIRInstrallField/AIR</installFolder><!– 默认安装路径 C:\Program Files\AIRInstrallField\AIR –>
- <!– The subpath of the Windows Start/Programs menu to use. Optional. –>
- <programMenuFolder>AIRTest_programMenuFolder</programMenuFolder><!– 开始/程序 快捷方程式所在文件夹 –>
- <!– The icon the system uses for the application. For at least one resolution,
- specify the path to a PNG file included in the AIR package. Optional. —>
- <!– 图标的大小必须和标签中标写的尺寸一致 –>
- <icon>
- <image16x16>icons/logo.png</image16x16><!– 系统菜单中及系统控制面板添加程序中的图标 –>
- <image32x32>icons/logo_32.png</image32x32><!– 桌面图标,窗口图标 –>
- <image48x48>icons/logo_48.png</image48x48><!– 安装目录EXE文件图标 –>
- <image128x128>icons/logo_128.png</image128x128><!– 未知 –>
- </icon>
- <!– Whether the application handles the update when a user double-clicks an update version
- of the AIR file (true), or the default AIR application installer handles the update (false).
- Optional. Default false. —>
- <!– <customUpdateUI></customUpdateUI> –><!– 是否为同一版本的时候双击直接更新 –>
- <!– Whether the application can be launched when the user clicks a link in a web browser.
- Optional. Default false. —>
- <!– <allowBrowserInvocation></allowBrowserInvocation> –><!– 是否应用程序可以通过浏览器激活 –>
- <!– Listing of file types for which the application can register. Optional. –>
- <!– <fileTypes> –>
- <!– Defines one file type. Optional. –>
- <!– <fileType> –>
- <!– The name that the system displays for the registered file type. Required. –>
- <!– <name></name> –>
- <!– The extension to register. Required. –>
- <!– <extension></extension> –>
- <!– The description of the file type. Optional. –>
- <!– <description></description> –>
- <!– The MIME type. Optional. –>
- <!– <contentType></contentType> –>
- <!– The icon to display for the file type. Optional. –>
- <!– <icon>
- <image16x16></image16x16>
- <image32x32></image32x32>
- <image48x48></image48x48>
- <image128x128></image128x128>
- </icon> —>
- <!– </fileType> –>
- <!– </fileTypes> –>
- </application>
这里主要是项目的导出,至于如何安装项目,抽空再写吧。