
本篇简单说说在如何在 Linux 系统上通过源码编译的形式安装 Tengine,纯属笔记。
前一篇写了《CentOS 通过源码编译形式安装 Nginx》,其实 Tengine 是由淘宝网发起的 Web 服务器项目。它在 Nginx 的基础上,针对大访问量网站的需求,添加了很多高级功能和特性。Tengine 的性能和稳定性已经在大型的网站如淘宝网,天猫商城等得到了很好的检验。它的最终目标是打造一个高效、稳定、安全、易用的 Web 平台。从 2011 年 12 月开始,Tengine 成为一个开源项目,Tengine 团队在积极地开发和维护着它。Tengine 团队的核心成员来自于淘宝、搜狗等互联网企业。Tengine 是社区合作的成果,我们欢迎大家参与其中,贡献自己的力量。
Tengine 官网路径:http://tengine.taobao.org/
部署环境
Linux 版本:centos6.9-x64
Tengine 版本:tengine-2.3.2.tar.gz
关闭 Linux 机器防火墙
第一步,上传安装包
上传 Tengine 安装包 tengine-2.3.2.tar.gz,这里上传到 /root 下。

第二步,解压安装包
对第一步上传的安装包进行解压并进入到解压目录,命令如下。
命令1:tar -zxvf tengine-2.3.2.tar.gz
命令2:cd tengine-2.3.2

第三步,检查安装依赖
这里计划把 Nginx 安装到 /usr/local 下,检查依赖命令如下。
./configure \
–prefix=/usr/local/tengine/ \
–error-log-path=/var/log/tengine/error.log \
–http-log-path=/var/log/tengine/access.log \
–pid-path=/var/run/tengine/tengine.pid \
–lock-path=/var/lock/tengine.lock \
–with-http_ssl_module \
–with-http_flv_module \
–with-http_stub_status_module \
–with-http_gzip_static_module \
–http-client-body-temp-path=/var/tmp/tengine/client/ \
–http-proxy-temp-path=/var/tmp/tengine/proxy/ \
–http-fastcgi-temp-path=/var/tmp/tengine/fcgi/ \
–http-uwsgi-temp-path=/var/tmp/tengine/uwsgi \
–http-scgi-temp-path=/var/tmp/tengine/scgi \
–with-pcre
结果信息如下:
checking for OS
+ Linux 2.6.32-696.el6.x86_64 x86_64
checking for C compiler … not found./configure: error: C compiler cc is not found
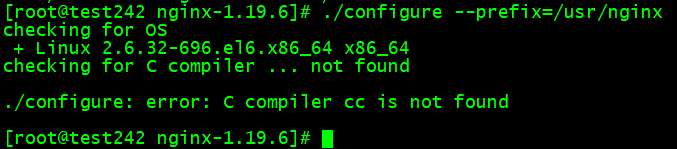
说明缺少 C 编译环境,执行下面命令安装相关环境包。
命令:yum -y install gcc gcc-c++
再次执行检查依赖命令,结果如下:
[root@test242 nginx-1.19.6]# ./configure \
> –prefix=/usr/local/tengine/ \
> –error-log-path=/var/log/tengine/error.log \
> –http-log-path=/var/log/tengine/access.log \
> –pid-path=/var/run/tengine/tengine.pid \
> –lock-path=/var/lock/tengine.lock \
> –with-http_ssl_module \
> –with-http_flv_module \
> –with-http_stub_status_module \
> –with-http_gzip_static_module \
> –http-client-body-temp-path=/var/tmp/tengine/client/ \
> –http-proxy-temp-path=/var/tmp/tengine/proxy/ \
> –http-fastcgi-temp-path=/var/tmp/tengine/fcgi/ \
> –http-uwsgi-temp-path=/var/tmp/tengine/uwsgi \
> –http-scgi-temp-path=/var/tmp/tengine/scgi \
> –with-pcre
…./configure: error: the HTTP rewrite module requires the PCRE library.
You can either disable the module by using –without-http_rewrite_module
option, or install the PCRE library into the system, or build the PCRE library
statically from the source with nginx by using –with-pcre=<path> option.[root@test242 nginx-1.19.6]#
第四步,安装 pcre
命令:yum -y install pcre-devel
再次执行检查依赖命令,结果如下:
[root@test242 tengine-2.3.2]# ./configure \
> –prefix=/usr/local/tengine/ \
> –error-log-path=/var/log/tengine/error.log \
> –http-log-path=/var/log/tengine/access.log \
> –pid-path=/var/run/tengine/tengine.pid \
> –lock-path=/var/lock/tengine.lock \
> –with-http_ssl_module \
> –with-http_flv_module \
> –with-http_stub_status_module \
> –with-http_gzip_static_module \
> –http-client-body-temp-path=/var/tmp/tengine/client/ \
> –http-proxy-temp-path=/var/tmp/tengine/proxy/ \
> –http-fastcgi-temp-path=/var/tmp/tengine/fcgi/ \
> –http-uwsgi-temp-path=/var/tmp/tengine/uwsgi \
> –http-scgi-temp-path=/var/tmp/tengine/scgi \
> –with-pcre
…./configure: error: SSL modules require the OpenSSL library.
You can either do not enable the modules, or install the OpenSSL library
into the system, or build the OpenSSL library statically from the source
with nginx by using –with-openssl=<path> option.[root@test242 tengine-2.3.2]#
第五步,安装 openssl
命令:yum -y install openssl-devel
再次执行检查依赖命令,可以看到不再缺少依赖。
第六步,编译
命令:make
第七步,安装
命令:make install
第八步,启动
进入 Tengine 的安装目录 /usr/local/tengine,并启动 Nginx 服务。
命令1:cd /usr/local/tengine/
命令2:./sbin/nginx
报错信息为:nginx: [emerg] mkdir() “/var/tmp/tengine/client/” failed (2: No such file or directory)
第九步,创建目录
按照报错要求创建目录
命令:mkdir -p /var/tmp/tengine/client
再次执行第8步命令2启动 Tengine。
第九步,测试
通过浏览器访问:http://机器IP:80 测试是否安装成功。

看到上面测试页,说明 Tengine 已安装成功。如果打不开上面页面,可能是机器的防火墙没关,先关闭防火墙再进行验证。
使用命令:service iptables stop 或者 systemctl stop firewalld


sudo apt-update
sudo apt-get install libpcre3-dev
在Ubuntu上,zlib-devel 包对应于 zlib1g-dev。你可以使用以下命令安装它:
sudo apt-update
sudo apt-get install zlib1g-dev